 Mohammed Belkharraf • 1366 days ago • 10 min read
Building a new website, there is a high chance you’ve already stumbled across WordPress. After all, we are talking about the most popular content management system (CMS), powering over 35% of the world’s online projects.
WordPress is famous for its easy installation, and most hosts can even offer to take care of the setup. But what if you can’t count on the expert assistance of your provider? This guide will help you learn how to install WordPress on your own Scalahosting, manually or with the help of a software auto installer.
But let’s start from the beginning.
The following review includes essential information, such as:
- What is WordPress?
- Why Choose ScalaHosting?
- How to Install WordPress Manually?
- How to Install WordPress via SPanel(Absolutely Free) ?
- Things to do After Installing WordPress
What is WordPress?
WordPress is a content management system that relies on PHP and MySQL to operate properly. WP is an open-source platform, which means that anyone is free to check out the source code and work on future improvements.
This proved crucial for the WordPress project.
Starting off as a simple blog application, WP’s growing community helped elevate the CMS to new heights. The app became so versatile that you could easily build any kind of page with it – an ecommerce store, a real estate website, forums, portfolios, nothing was impossible with the right plugins.
For all it’s possibilities, WordPress is a pretty lightweight platform. Unless you stuff your website with unnecessary themes, images, and plugins, even a shared web hosting deal can work perfectly for you. Of course, the more resources – the better, so you can consider an affordable VPS deal for maximum efficiency.
The most popular CMS has some impressive names among its client base. Sony Music, BBC America, TechCrunch, and The New York Times are just some of the big names that trust WP for their online presence.
If you’ve already set your sights on WordPress for your new website as well, Step One would be setting up the software.
Why Choose ScalaHosting?
WordPress Hosting Made Fast, Secure & Easy To Manage, powered by the world's best 24/7 support & trusted by 700,000 website owners.
Optimized WordPress Hosting Environment
Scala Hosting configures the WordPress hosting servers to perform at its best and suit all WP requirements. That is essential to deliver the best WordPress hosting experience to our customers.
Free Website Migration
Scala Hosting migration specialists will migrate as many websites as you ask, free of charge. There will be no downtime, and we'll also ensure that they work properly on the new server
Any website can be migrated in 3 easy steps:
- You provide the login details to your old server
- We migrate the website and verify it works on the new server
- You change the nameservers and point the website to the new server
Web Attacks Blocker
Obviously, Scala Hosting took care of the security issues as well. When you purchase a cheap WordPress hosting plan, your website will be protected by tons of tools. Scala Hosting deploys custom mod_security rules to block 99.9% of the web attacks. It doesn't matter which plan you choose. The best WordPress hosting is here at Scala Hosting.
Dedicated Firewall
If you really care about the security of your website then you need a dedicated firewall installed and configured for you specifically. However installing and configuring a firewall is an arduous task. That is why Scala Hosting will do it for you. A dedicated firewall is available with every WordPress hosting plan.
Custom Security Rules
When it comes to website security, the best way to go is to optimize your security rules for your content management system specifically. In this case it requires advanced administration and WordPress knowledge. Scala Hosting IT experts have already designed the rules and will install them on your newly purchased hosting plan.
Malware Scans & Removal
All WordPress web hosting plans feature regular malware scans and removal. This is a premium feature included with the sole idea to add increased protection levels to your account. Since security is one of the keys to an effortless web hosting experience, all WP hosting plans are covered by it.
Automated Updates
Some WordPress users complain of the constant need to update the system to the newest version. You will not have this problem as a Scala Hosting client. Scala Hosting has set up their system to automatically update your WordPress to the latest version in the background. You can also disable the automated updates if you don’t want to update WordPress.
7 Daily Backups
Afraid of losing your data? No need to be. Every day is a backup day! Get 7 restore points for the last 7 days with any of the WordPress hosting plans. If you need to restore your website to a previous date just ask Scala Hosting IT experts and they will assist you as fast as possible. You can also restore your WordPress web site from the control panel.
Free Managed Service
Every WordPress web hosting plan from WP Start and up features a free managed service feature. This means that Scala Hosting support team will go the extra mile and help you with more advanced WordPress issues such as plugin troubleshooting – a testament to the knowledge of our WordPress experts.
Free CDN
A content delivery network (CDN) can often lead to a dramatic website loading speed improvement. Usually CDNs are quite expensive and most website owners cannot afford them. Scala Hosting offers you the CloudFlare CDN for free with every WordPress hosting purchase.
Free Domain
Pre-pay the WP Advanced or the WP E-commerce hosting plan for a year and get a .com domain for free. Pre-pay the next year and get another year on your domain for free. This can go on forever. The best WordPress hosting deserves the best domain deal.
Free SEO Analysis
Search engine optimization (SEO) is a great way to attract a large number of targeted visitors to your website or blog. As a Scala Hosting client you will receive a free SEO analysis of your website containing valuable information about your website presence in the search engines that you can use to your advantage.
Free SEO Tools
Each of Scala Hosting cheap WordPress hosting plans features free search engine optimization (SEO) tools which can help you optimize your website in order to meet the criteria of various search engines like Google. Non-optimized websites do not rank well and often lose massive amounts of potential targeted traffic.
How to Install WordPress Manually?
You can often trust Scala Hosting web hosting provider with software installations, but if you learn how to set up WordPress manually, that makes you prepared for any kind of situation. This is the longest and most skill-demanding route, but also the best way to gain more experience and confidence with the app management.
Step 1 – Downloading WordPress
- Go to https://wordpress.org/download/ and download the installation file of the latest stable version. There is a .tar.gz for users on a Unix-based operating system.
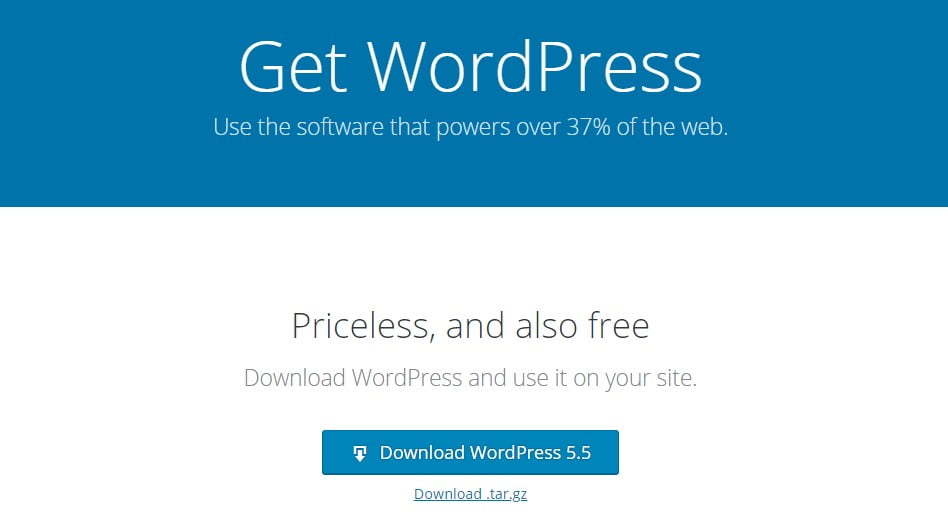
- Choose a location on your computer to store the file.
- Unzip the WordPress package in the desired folder.
Alternative: If you are using shell access to access the server, you can download and extract the archive with two simple commands.
wget https://wordpress.org/latest.tar.gz
tar -xzvf latest.tar.gz
Step 2 – User and Database Creation
The easiest way to create and manage databases is if your server has phpMyAdmin preinstalled. It’s an open-source, web-based interface that acts as an administration tool, and you can often find it within the control panel of most web hosting providers.
- Open phpMyAdmin and click on the Databases tab.
- Click on the Create Database button and choose your table name.

Note: Some hosting providers are configured in a way they require you to use a name that starts with your username and an underscore for easy transfer afterward. Check with your host if they have such requirements.
- After your new database is created, you need to choose a collation for encoding and language. The UTF8 range is often the best Unicode option.
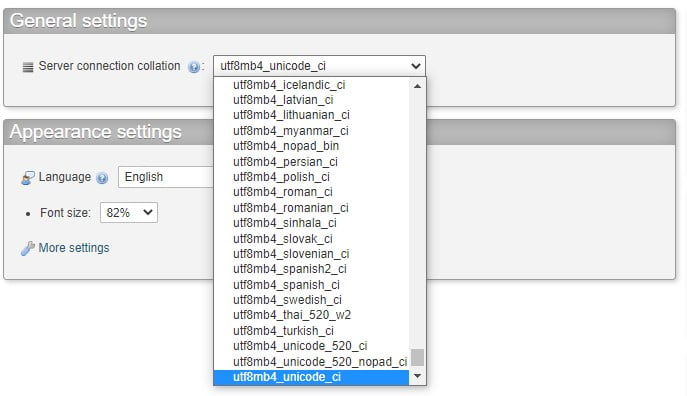
Time for the user creation.
- Go to the Users tab in the upper menus and click on Add User.
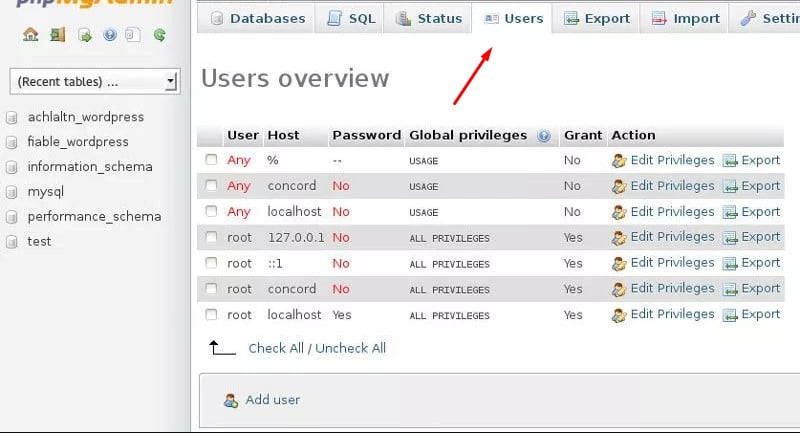
- Choose a username and a secure password. The ideal passkey would be a combination of upper and lowercase letters, numbers, and special symbols.
- Ensure the option Use Text Field is selected from both drop-down menus.
- You can leave the Global Privileges options under their default settings.
- Click Go.
- Go back to the Users screen and choose the Edit Privileges option.
- Select your database from the Database-specific Privileges section. Click Go.
- Check all the privileges on the refreshed page and hit Go again.
Now make a note of the name you have after Server: in the grey rectangle on the top of the page. By default, it is localhost, but it can also be an IP string set by the host.
Step 3 – Set Up the wp-config.php File
The wp-config file contains all essential WordPress configuration info. You can either create one yourself during your initial WP setup or let the software take care of this during its installation.
- Go to where you extracted the WordPress archive from the first step.
- Rename the file wp-config-sample.php to wp-config.php. Open it with any text editor.
- You will see a section saying:
// ** MySQL settings – You can get this info from your web host ** //
- Now change the default details to the ones we just created in the previous steps.
- For DB_NAME, put the name of your database.
- For DB_USER, fill in your username.
- DB_PASSWORD needs to be replaced with your new passkey.
- DB_HOST is the name you wrote down in the Server: section of phpMyAdmin.
- DB_CHARSET stands for the database character set. Default values should work just fine.
- DB_COLLATE is a field you should usually leave blank unless you have specific settings in mind.
- Save the newly-edited wp-config.php file.
You are now one step closer to successfully installing WordPress manually.
Step 4 – Uploading Your Site Files
Thinking about where to put your WordPress files, you have two obvious choices – the root directory of your account or a subfolder.
- You can use an FTP client or shell access for the file upload.
- Transfer the contents of your WordPress directory to the new location.
- Leave the destination field empty if you want to install WP in the root directory or name a subfolder if you wish to go that route.
Alright, just one more thing to do.
Step 5 – Install WordPress
Now that your files are in place and tied to your newly-created database, time to run the installation script.
- Open your web browser.
- Go to yourdomain.com/wp-admin/install.php
- If you uploaded your files in a subfolder, the path should be yourdomain.com/subfolder/wp-admin/install.php
- The system will try and locate the wp-config.php file. If it can’t find it – it will offer you to create it on the spot.
- The installation wizard will take you through the last steps like creating a WP user and pass, setting an administrative email, and defining search engine visibility.
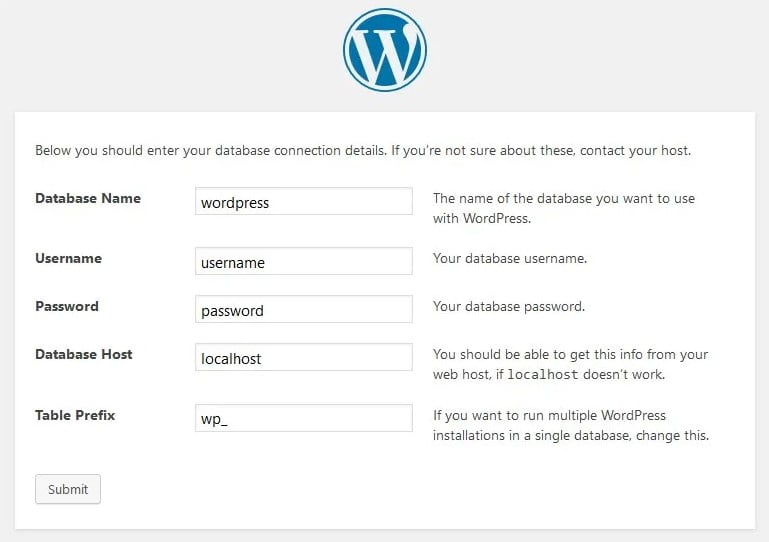
Congratulations! You can now log in to your new WordPress website.
But this all sounds like plenty of work, especially if you have zero technical experience. There has to be an easier way.
How to Install WordPress via SPanel(Absolutely Free)
Scala Hosting equips all cloud VPS plans with the custom SPanel solution for easy web hosting management. The control panel is a wonderful alternative to cPanel, especially when you consider it’s absolutely free.
SPanel has it all – advanced security monitoring, effortless email management, easy account backups, and data restore.
The benefits for WordPress users are particularly noteworthy. Installing the app takes no more than a minute:
- Log in your SPanel
- Go to SWordPressManager under the Tools section
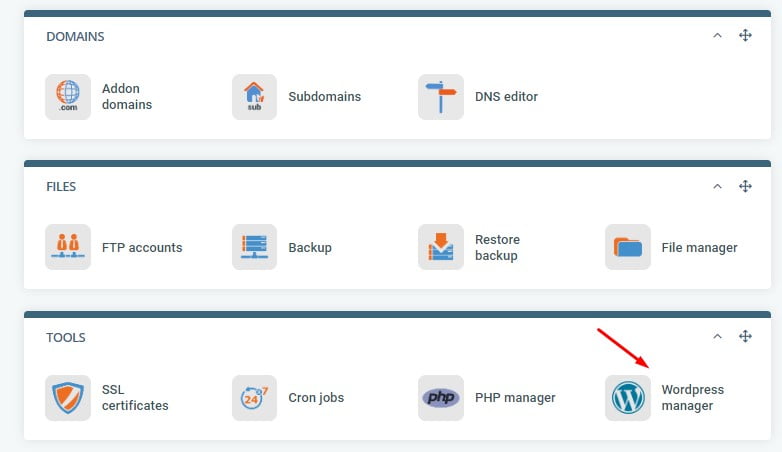
- Fill in the installation details.
- Hit Install WordPress.
Now that was much easier, wasn’t it?
Additionally, SwordPressManager is a versatile tool where you can auto-lock your account, set password restrictions, or deal with automatic updates.
Things to do After Installing WordPress
Once you get your installation up and running, it’s time to start building your website. There are a couple of places you can start.
- Pick a great theme. There are thousands of free WP templates to choose from in reputable places like ThemeForest, Envato, and TemplateMonster.
- Install essential plugins. You don’t need to bloat your site with a lot of add-ons, pick only the ones you really need – website security, SEO, caching, the works.
- Consider some speed optimizations. A fast-running website will always rank well and attract lots of visitors. You can check our WordPress speed optimization guide for more insights.
Final Takes
This tutorial should have taught you how to install WordPress, both manually and through a control panel. From here on out – it’s all up to your imagination. Utilize WP to the fullest and build an amazing project that will wow every visitor.

